Saturday, March 24, 2012

Vagabond

Here's a great video from CHA . Tim Holtz shows us how to use the new 
"Embossing Diffusers" and how the "Gauge Keys" work with his Vagabond.


He also provides those of us who currently own the Vagabond....the opportunity to get these gauge keys...to avoid us jamming the rollers from using too thick a sandwich. I have been using cereal boxes cut out to achieve the same effect as the embossing diffusers. The keys will be great to prevent the machine from a premature death!!!!
Here's the link to the promotion:

As  a devoted Vagabond user, I have taken the challenge and want to show you Where in the World is My Vagabond. . .see "she" is right by my head...LOL


(This just my profile with my friend on my messy scrapdesk!)

Love my Vagabond.


I got my Vagabond last April...LOVE. LOVE LOVE  HER!!!
I know Tim Holtz will not like me....as he thinks of "it" as a "boy"...
I have been using only the Sizzix brand dies and embossing folders and Cuttlebug embossing folders in her as I heard many vagabonds have died...gulp!
So I have been using my trusted  little Cuttlebug by Provocraft or my Bigkick for sandwiches that are sometimes "tight" or "if-fy" LOL.
I have my Cricuts but these are used for mostly cutting fonts and images...whereas I use these other die cutting machines exclusively for embossing.
I do use Spellbinder dies(these can cut and then emboss and use as a stencil) in my cuttlebug and am afraid to use them in my vagabond for now...... (I heard some have wrecked the motor when the sandwich used jambed the rollers.......)
 Here is my baby when I first got "her" :
WOW!!!
Isn't she cute. It came with stickers like the olden days....places you've been to.....This baby is electronic so you just press a button...no more cranking..... and very  compact( into a cute little case when closed). I do not have much room so it is nice.....Plus it saves my poor wrist  from using the crank on the other machines.
Only one year warranty?????

Thursday, March 22, 2012

March Card Swap

I've completed another card swap with my Circlet friends. We each are to design and contribute 2 cards and make enough for 14 participants. Here are my contributions:


Recipe:
All cardstock from American craft, paper as well.
For the first (top) card:
I used Tim Holtz cling set stamp" The Journey"-darn "journey" has e wrong...I just caught at last minute...Awe well..decided too late ..Blushing That is stamped with Memento's Tuxedo black. I distressed the edges with Frayed Burlap distress ink, Cuttlebug folders used: Clockworks, Polka dots, and Disney's cuttlebug die /embossing set "Bon Voyage" for the map. "Explore" is a layered die cut from cricut cartridge -"Wall and Decor". Ribbon from M(cheap dollar bin), and  card base from monogram cards from M's dollar bin....
The second, "cloud" card:

I used all cricut die cuts from cricut cartridge -"Something to Celebrate"to assemble, added skittles-ranger (sorry forgot the colour-clear white bottle) to the letters, Weather wood distress ink used on cloud - ,Peachy keen stamp for mouth, using  red memento ink and distress mustard seed ink on sun edge, and added googlies eyes from Zellers.
Hope you enjoy my cards!

Saturday, March 17, 2012

Happy St Patrick' s Day

Happy St Patty's Day !
I was listening to my local CTV news....I thought I'd share this  delightful video from you tube:

Monday, March 12, 2012

Favorites recipe sites listed

Here's a great site to look for great recipes . I love my Expression cake (...mind you-I do not use it as often as I'd like.....) One trick is to chill any cuts-either with fondant, cookie dough, pie dough, chocolate melt....then remove from the cricut cake mat.
http://www.cricut.com/cake/RecipesTips.aspx

Here's another site that shows you "how to" along with recipes:
http://www.wilton.com/decorating/

I love making "cake pops"....love to eat to...Simple but pleasurable!!!
*photo from  bakerella site

The easiest recipe is follow any cake recipe instruction...or use a cake mix ... follow directions on package.
Once the cake is baked, let cool, then crumb completly. Have fun...kids love doing this part! It will look like dirt....LOL...yummy...
MIx 1 1/2 cup of prepared icing or a package of bought icing(Like Betty Crocker)...Chill and then shape into whatever shape...Decorate!
You can melt chocolate or other candy waffers.....add just enough "vegy oil" to get candy melts liquidy.
Stick the shape onto a candy/sucker stick.. Dip into melted candy chocolate.
Add other candy pieces for decoration...
Chill ...
.Enjoy!....
***LOL,,Cheaper than Starbucks!

Here's a great site for ideas:http://www.bakerella.com/category/pops-bites/cake-pops/

Air Compressor ....other uses


In February, I  picked up an 1/3 HP 2 gallon air compressor by Mastercraft /Canadian Tire brand to use with my copics..(*I have posted this on the Cricut forum as well.)...I had to buy a few small adapters from Home Depot(Canadian store price listed below) .... It works great....I must say it is so much fun...
I had bought the copic adaptor kit for $50.00 at copics...the aerosol can of air lasted all but 10 minutes.You still need the aerosol can adaptor.. 
Drum roll for the price for the compressor...   $24.99(reg $99.99)  I added the 2 extra pieces of connectors to make it work.(a hex nut for $0.87...and  1/4" industrial qc plug F.for $3.49...I have  included photos of the unit as well. :*simply click on photo to enlarge


The tubing connector that came in the kit I had (ABS 1) to the copic air can adapter is not used.....It was too small so that's why I got the two pieces from Home Depot to make it work ....LOVE IT! * It is only noisy when first start then once the tank is full-then it is quiet!!!!

***You can adapt it to use Stamping Up markers as well as Tombow markers by inserting reusable adhesive tac(used to hang temporary posters/replaces tape...simply play dough....to keep the tip in place) for making incredible skies, sand, grass effects..similarly with air paint but without the fuss or necesary skills as everyone knows there is quite a learning curve to use of air pen...I'll post images of projects later... Works like a charm.
***Thanks to Croatian Crafter as she  has shown you can also use it for sand blasting glass using a sandblasting gun($13.00) filled with Aluminium Oxide sand(from Auto Princess for $8.00)..

 (another form of glass etching, without use of the etching cream).This is hazardous so ..Please check out her site for more details.
http://www.croatiancrafter.blogspot.com/

***Air compressors can save you tons of money if you enjoy the "air y" effects to markers. Cans of air can cost from $16.00 for 5-10 minutes of use. The sandblaster and sand alone is the price for etching cream, as small jar is $16.00 for a few ounces.!Try it out.... Do watch out for a great sale at your neighbourhood hardware store as the "crafty" compressors can cost $200.00 to $599.00 or more! LOLWub

Saturday, March 10, 2012

Swap Smash Book

Hi. I participate in a Cricut Circle forum. It is practically the only “online” area I frequent and enjoy. The members I have met….all have a common obsession….”Cricut”…but we love to enable each other with different creative tools, shopping deals and other stuff….   I have learnt a great deal and have a great time participating. We frequently “swap” our creations, be it tags, cards and such. I recently participated in a “Smash” swap with a group of fantastic ladies from my Cricut Circle forum.  For those who do not know what a “Smash book” is, it is actually a new fun memory craze, made popular lately by EK Success/K&Company.Here's a short video to give you an idea:
http://www.youtube.com/watch?v=_PFsArr4Z1s
 Here’s an example of my pages...(I used paper from a stack by K&Company-Sweet Nectar -double sided paper,  stamps from Michaels' the $1.50 G studio stamps,  Stamping Up  Ink pad...sorry I forgot the colour....and embellies all from Michaels store. I made the envelop from TBBM  cricut cartridge. I used Scotch  Dry Adhesive glue....man I love that stuff!) :*simply click on photo to enlarge.


 TT


:


Here 's a clearer view and DO check this site for all the other pages from the Swap as well mine here…http://nothousework.blogspot.com/   (March 3 post..thanks Boomer Knows her photo of my pages are better than mine..lol)
We were 10 participants, contributed each 2 pages along with other “garnishes”….be it ribbon, tags,buttons, labels,folders, whatever….Here’s my Smash book together…I could not find my Bind-It-All so I used a cropadial and altered a calendar binder from Michaels instead. I "recycled" the calendar pages..lol.. and altered/used some of the dividers .... This is the front with the added embellies I got from the swap.
Here's the back

Here's a few of the pages:*some of the images/pictures are covered with sticky notes

I had to cut some of the pages to fit  but I kind of like the way  some of the odd sized pages look! l added some other pages....It is great fun ...now I am going to fill it with wonderful  memories.......Try it ladies.

Tuesday, March 6, 2012

Thank You "Card"

I was encouraged to start posting some of my creative juices...lol.
Some of my friends call me McGiver......well that's another story.....
I am not very good in writing....but I do play a lot....and love to share....
I will hopefully be able to share and demonstrate some of my favorite passtime creativity. If you want to "scraplift", please do  but do give my the "credit".
Merci!

I am attending a meeting tonight....as always....at the last minute....procrastinator is my middle name!....I  needed a "quick" Thank You card. as  I had attended a card game  "Friendship Night". Since I love making crafts.... I thought I'd check out my stash of craft stuff.....hummmm.
Well here is what I came up with::*simply click on photo to enlarge
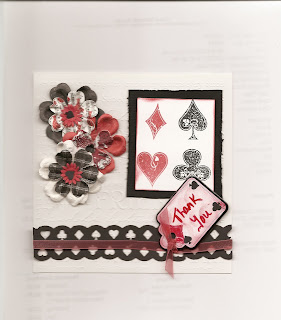
This is a 8 inches x 4inches cardstock(from Stampin Up)folded and scored  in half to make a 4 x 4 card. You can use a dull dry pen nib, or knitting needle or a bone scorer for a "crisp fold. Always fold the  bump side inside to make it look professional.... The inside is left blank.  I embossed the front with Cuttlebug. ( Sorry I forgot which  A2 embossing folder...it has lovely words of Friendship words on it). I thought it was perfect!!!!Since my card is slightly larger than the A2 folder, I passed the card a few times in the Cutttlebug, moving it slightly so that all the front got some embossed words on it. It does not matter to "match" up as I covered the areas with the flowers and the stamped area. . Ususally I  need to use a A plate , two B plates as a sandwich in the Cuttlebug. (YOU can use  any tool you have to emboss such  Sizzix, Vagabond, Big Kick etc with these embossing folders- just use the rubber gasket instead of the  final top plate). I use a red rubber gasket instead of the second  B plate to avoid getting the "unwanted seam".  I use the "Card Shape" clear stamps from  "Games" stamp collection from Inkadinkado. I think I got these a while back from an online store. I used Memento inks: Tuxedo black and (red) Lady Bug. Some times these clear polymer stamps "fleck ink" so I find using an eraser to roughen them up, wipe with a baby wipe ...then stamp as usual. Stamping Up inks do not seem to work well with these..Any of the pigment or craft inks, or chalks work great....I do prefer lately to use Memento inks.  These are more easily available at my LSS. I cut the cardstock with the stamped images and fit onto a black cardstock, trimmed and then used my MM distress tool on the black cardstock edge.
The flowers are  from Prima-I think I got these from Micheals (I love their jar they come in).....the 1/4 inch ribbon ,also from Michaels. The ribbon is "ATG" taped over a cardstock strip border punched with an EK Success "Card Suit"  slender  Punch. I saved the "confetti of the card suit to place  randomly on the center of the flowers and tag. I used my Bizzy Bee tweezers with Quick- Dry  Adhesive glue from Scotch ...the  stamped image on cardstock has dimention foams  , then  I used my ATG Scotch adhesive to tape onto the card..as well as to tape the border and the ribbon. The tag is chipboard....and a bit heavy....so I added  foam dimentions to it as well. .
The tag is cut using my Cricut from CTMH Art Philosophy at 1.5 inches. Oops I forgot to mention I distressed the edges using a sponge dabber and the Lady Bug Memento ink on both the card suit shapes stamped area cardstock and the tag. I misplaced my Thank You stamp so I just wrote on the tag.. I think I should of used THoltz Distress ink instead as those blend much better..well I did say I am  kind of in a hurry...lol! I hope you enjoy this first post!